• Global CNC market projected to reach $128B by 2028 • New EU trade regulations for precision tooling components • Aerospace deman
NYSE: CNC +1.2%LME: STEEL -0.4%

How to Diagnose Automated Production Line Troubleshooting Issues From Sensors to PLC Logic
How to Diagnose Automated Production Line Troubleshooting Issues From Sensors to PLC Logic
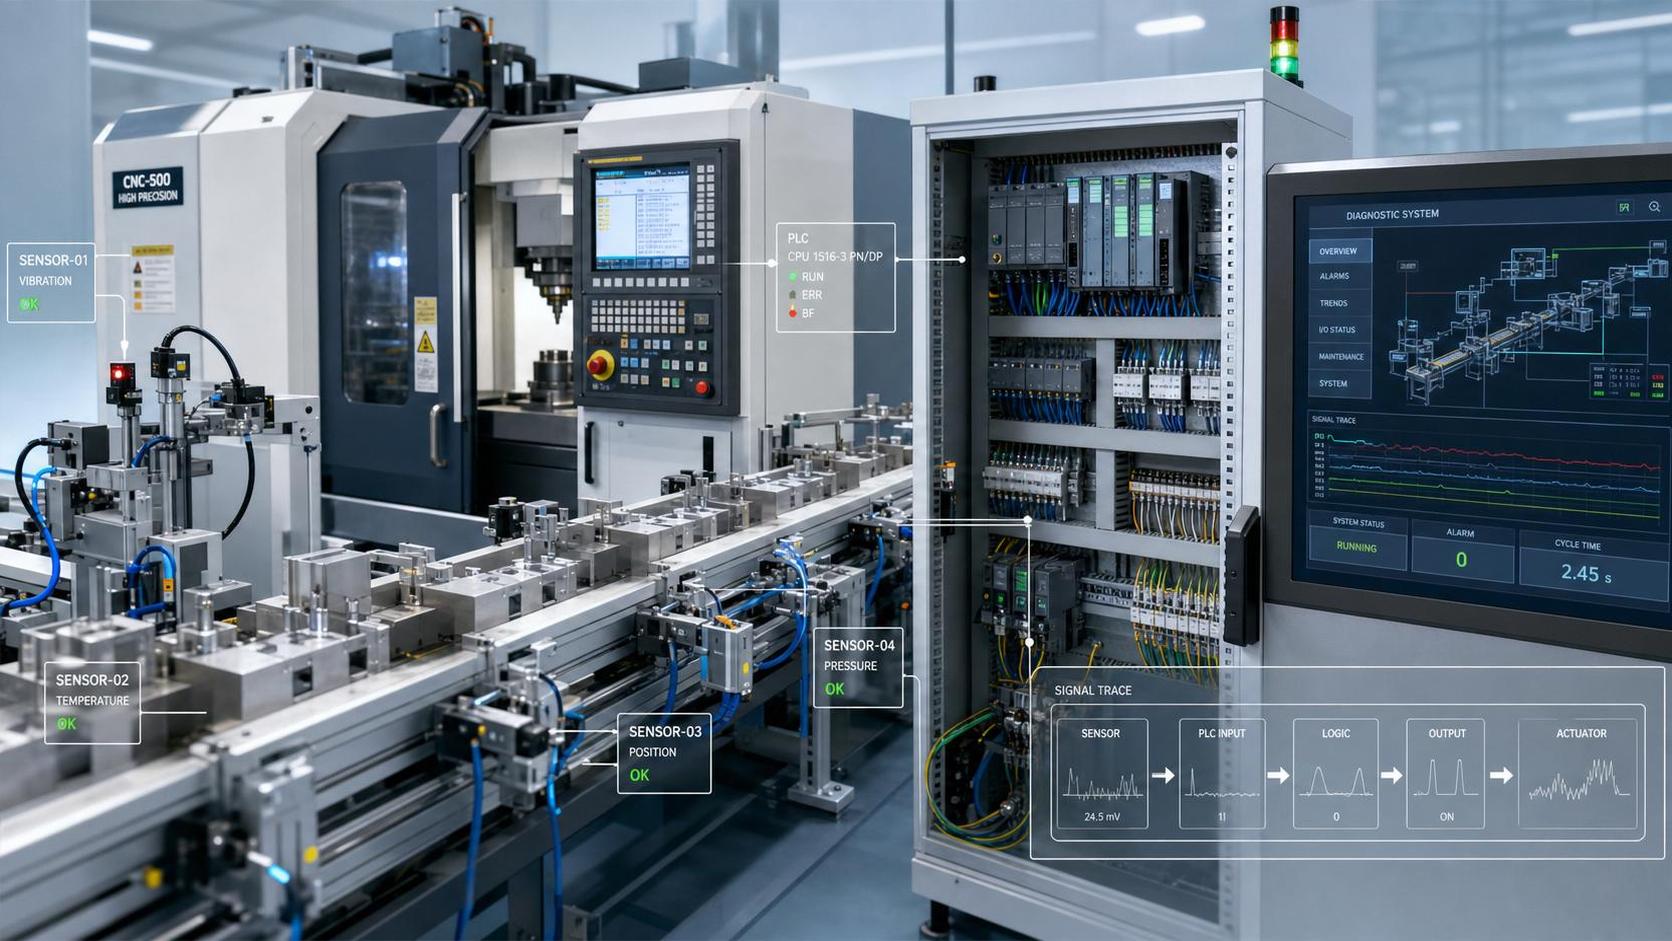
Automated Production Line troubleshooting often begins with one alarm on an HMI screen.
Yet the actual fault may sit far upstream, hidden in a sensor, cable, terminal, or PLC sequence.
In CNC-driven manufacturing, that gap between symptom and cause is where downtime grows.
A stalled pallet transfer, missed tool change, or failed part clamp can stop an entire cell.
This is why Automated Production Line troubleshooting needs a full-chain method, not guesswork.
The most effective teams diagnose from field signals to logic decisions, then to motion response.
That approach fits modern machine tools, robotic stations, transfer lines, and smart manufacturing systems.
It also reduces the common habit of replacing parts before proving the root cause.
Start with the Fault Chain, Not the Alarm Text
One of the biggest mistakes in Automated Production Line troubleshooting is trusting the first message too much.
An alarm usually reports where the sequence stopped, not where the problem started.
For example, a robot handshake timeout may actually come from a missing fixture confirmation.
A fixture confirmation fault may come from a dirty proximity sensor.
That sensor may still be healthy, while the real issue is voltage drop at a loose terminal.
So the first task is mapping the fault chain in sequence order.
Ask four direct questions before touching hardware:
- What was the last confirmed action?
- What input or condition was expected next?
- Which controller made the stop decision?
- Did the failure happen once or repeatedly under the same condition?
This small discipline makes Automated Production Line troubleshooting faster and much less expensive.
Check Sensors and Field Devices Before Diving into PLC Logic
Many production faults are still caused by simple field problems.
That includes blocked photoelectric sensors, damaged cables, weak connectors, air pressure loss, and sticky solenoids.
In automated CNC lines, contamination is a constant factor.
Coolant mist, chips, cutting oil, and vibration slowly change signal quality.
A practical inspection sequence usually works better than random testing:
- Confirm the device state visually at the machine.
- Check indicator LEDs on sensors, valves, and I/O modules.
- Measure supply voltage under load, not only at rest.
- Inspect terminals, shielding, and grounding points.
- Compare the physical condition with the PLC input status.
This is where Automated Production Line troubleshooting becomes evidence-based.
If the sensor changes state physically but not in the PLC, the path is narrowed immediately.
If the PLC input changes correctly but the machine still stops, the problem moves downstream.
Common field-level warning signs
- Intermittent faults during high-speed cycles
- Random stops after warm-up
- Input flicker on diagnostics pages
- Actuators that move slowly but still complete travel
- Different behavior between manual mode and auto mode
Use PLC Diagnostics to Separate Logic Faults from Input Problems
Once field signals are verified, PLC analysis becomes the next step in Automated Production Line troubleshooting.
Here the goal is simple.
Find out whether the controller is missing a real condition or blocking the sequence by design.
Modern PLC platforms make this easier with online monitoring, cross-reference tools, and forced trend capture.
Look at the rung, function block, or state machine where execution stops.
Then trace every permissive, interlock, timer, and mode condition.
In many cases, the logic is correct but one hidden condition is false.
That may include safety reset status, axis ready bits, servo healthy feedback, or recipe mismatch.
A useful review pattern is shown below.
This structure keeps Automated Production Line troubleshooting grounded in logic instead of assumptions.
Do Not Ignore Motion, Timing, and Handshake Conditions
In flexible production lines, not every fault is a basic I/O problem.
A large share of Automated Production Line troubleshooting involves timing windows and subsystem coordination.
This is especially true in CNC cells connected to robots, tool magazines, AGVs, or transfer systems.
For instance, a part-present signal may arrive late rather than never.
A servo ready bit may flicker during acceleration.
A robot complete signal may be sent, but not latched long enough for the receiving PLC scan.
These cases are harder because every device looks healthy when checked later.
Where timing faults usually appear
- Robot and CNC machine handshake signals
- Clamp confirmation before spindle start
- Axis home checks after maintenance or recovery
- Tool changer position verification
- Conveyor accumulation and release logic
When these symptoms appear, trend data matters more than static status.
Capture timestamps, cycle counts, and state transitions around the failure window.
That makes Automated Production Line troubleshooting far more precise in high-speed operations.
Build a Repeatable Troubleshooting Workflow for Production Teams
Fast recovery should not depend on one expert standing next to the machine.
A repeatable process is what turns isolated skill into operational reliability.
For Automated Production Line troubleshooting, that process should be simple enough to use under pressure.
- Record the exact alarm, timestamp, machine state, and product condition.
- Identify the last completed step in the sequence.
- Verify field inputs and outputs physically and on diagnostics.
- Trace PLC logic for missing permissives and mode conflicts.
- Review motion, drive, and network timing if the fault is intermittent.
- Test the correction under the same operating conditions.
- Document the root cause and preventive action immediately.
This matters even more in global manufacturing environments.
Sites often run mixed equipment from different OEMs, countries, and control platforms.
Without a common troubleshooting standard, diagnosis slows and repeat failures multiply.
What Better Diagnosis Means for CNC and Precision Manufacturing
In CNC machining and precision manufacturing, downtime is rarely limited to one machine.
A short stop can delay fixtures, operators, quality checks, and downstream assembly.
That is why strong Automated Production Line troubleshooting has direct business value.
It protects throughput, stabilizes delivery, and supports better maintenance planning.
It also helps teams decide where to invest next.
If repeated failures come from field contamination, shielding, enclosure upgrades, or sensor selection may matter most.
If logic conflicts dominate, software review, version control, and simulation may give better returns.
If timing errors appear across systems, interface standards and event logging should move higher on the roadmap.
The practical takeaway is clear.
Effective Automated Production Line troubleshooting starts at the sensor, passes through wiring and I/O, then proves the PLC logic and motion response.
When that discipline becomes standard practice, troubleshooting gets faster, root causes get cleaner, and production stays far more predictable.
Recommended for You
 How to Design Cost-Effective Fixtures That Maintain Cycle Time in Mass ProductionCNC Machining Technology Center
 Is Learning CNC Programming Worth It for Shop Owners Seeking Higher Margins?CNC Machining Technology Center
 CNC Machine Arrival Inspection: Check Shipping Damage, Accuracy, Safety, and DocumentsCNC Machining Technology Center
 How to Select a Machine Tool for Aerospace Parts with Tight Tolerances?Machine Tool Industry Editorial Team
 How to Select CNC Equipment for High-Mix, Low-Volume ProductionCNC Machining Technology Center
 Can CNC Machining Inconel Control Tool Wear in High-Temperature Aerospace Parts?CNC Machining Technology Center

Aris Katos
Future of Carbide Coatings
15+ years in precision manufacturing systems. Specialized in high-speed milling and aerospace grade alloy processing.
▶
Smart Manufacturing for Small Businesses: Where Automation Delivers the Fastest ROIMachine Tool Industry Editorial Team▶
How Smart Manufacturing Technology Improves OEE Across Industry 4.0 Production LinesMachine Tool Industry Editorial Team▶
How to Evaluate an Automation Line for Electronics Production Before InvestmentMachine Tool Industry Editorial Team▶
How to Evaluate an Automated Production Line for Output, Flexibility, and ROIMachine Tool Industry Editorial Team▶
How Smart Manufacturing Improves Traceability and Quality Control in Aerospace?Machine Tool Industry Editorial Team
Mastering 5-Axis Workholding Strategies
Join our technical panel on Nov 15th to learn about reducing vibrations in thin-wall components.

Providing you with integrated sanding solutions
Before-sales and after-sales services
Comprehensive technical support